You installed WordPress and now the site now has that mundane blue, generic theme, Kubrick. The front page has a loop for recent posts and a right sidebar; nothing more, nothing less is available.
But you want more; more functions, more colors, more graphics. Inevitably you start browsing the web for prefab themes, free and premium, to find one that fits with your needs.
Tweaking is expected; ask any WordPress theme master. There is simply no such thing as the perfect WP theme. Every theme is a symbol of the person behind it, and no two themes look the same after tweaking. This tutorial covers four tweaks you can add to the front page for a more dynamic and personal look.
Diversifying Your WordPress Site Layout
One of the most monotonous things about WordPress has to be its theme structure, as it generally tends to look the same for front page, single and pages. But since WP is open source and highly user friendly, this is not hard to change. You can even create a WP theme and use these tweaks to make it different. Below I list four tutorials where you will be able to separate the look of the front page from the rest of the site.
1.Adding Thumbnails To The Loop Using Custom Fields
An appreciated feature in professionally made themes is thumbnail images in the loop of posts on the front page. I will now instruct how you can do it yourself, just like the pros.
1.a Using Custom Fields
With Custom Fields, you can add extra features to single posts. In this case, regarding thumbnail images, you will be able to assign an image to the loop, without having to include it in the original post entry.
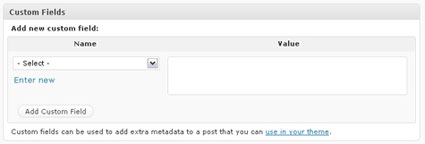
You will find Custom Fields when creating a New Post in the WordPress admin – under the editing window, passed Excerpts, and Send Trackbacks.

1.b Adding the Custom Field Key “thumb_image”
Start by adding a new custom field, press Enter New, type in “thumb_img” in the Name field and the full URL to the thumbnail image in the Value field. Now this Key has been set and will appear in the scroll down menu.
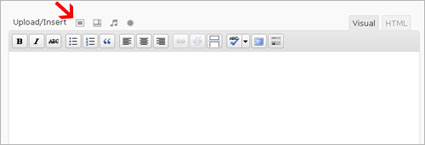
Psst! Use the image upload button above the editing window to fast and easy upload your thumbnail. Press File URL to display the address, copy and paste it into Value.

For every post you want to add a thumbnail, select “thumb_image” in the Name menu and add your thumbnail URL to “Value”, then click Add Custom Field.
1.c Making the loop thumbnail-ready
In the admin, go to Appearance>Editor and select the file Index.php. Then locate the code below, I suggest you use the search function in your web browser (Ctrl+F).
 <?php while (have_posts()) : the_post(); ?>
<?php endwhile; ?>
Then add the code below in between the code – you are now instructing the web browser to check if there are any thumbnails assigned and display them to posts in the front page loop.
<img src="<?php echo get_post_meta($post->ID, "thumb_image", true);?>" />
That’s it. You have successfully added the option of assigning thumbnail images to posts in the front page loop.

2. Using excerpts to limit posts
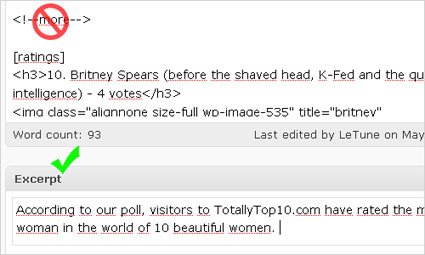
There are few themes today that do not shorten post entries in the loop. Most of them have also used the Excerpt in doing so. However, a common mistake among WordPress users is using the <!–more– > tag instead.
If your theme is Excerpt-ready, all you have to do is add the text you want to describe the post in the loop, in the box named Excerpt under the editing window in Add New Post. This way you will avoid the text getting cut off in mid-sentence by an ellipses.

However, if you do not have Excerpt activated and you have no other option, then it can be fixed with a simple code replacement in the index.php.
Go to Appearance>Editor in the admin, and select index.php (Main Index Template).
Use the search feature in your web browser to locate the code below.
 <div class="entry">
<?php the_content() ?>
</div>
Replace
<strong><em><?php the_content() ?></em></strong>with the code below.
<?php the_excerpt () ?>
Now, you can properly control the text displayed in posts in the loop on the homepage. No more more-tags or limit-posts plugins.
3. Moving the sidebar from right to left
If you have a theme you like and want to keep but would like to add a left sidebar, this tutorial is for you. We cannot guarantee that it will work on all themes, as they may differ in code.
One of the most tweak-friendly themes is Kubrick, WordPress’ default theme, which is why we will use its stylesheet and templates for this tutorial. If you are using a different theme, these instructions may still apply, although a more trial and error approach is recommended. Another suggestion is to save the theme folder to your local computer, so that easily can reset the theme if the tweaking goes too far.
Now, of course you also have the option of heading out to find a 3-column theme that comes with an additional left sidebar. However we will assume you are you would prefer to tweak your existing theme.
This tutorial requires a theme with centered main margins and that is fairly simple, preferably Kubrick. This since code tend to differ quite a lot from theme to theme. It is simply to risky to dig around in code of more advanced themes, since the code is more sensitive to tweaking.
Go to Appearance>Editor and open the stylesheet. Locate the code below:
 .narrowcolumn {
float: left;
padding: 0 0 20px 45px;
margin: 0px 0 0;
width: 450px;
}
…and replace it with the following code:
 .narrowcolumn {
float: right;
padding: 0 45px 20px 0px;
margin: 0px 0 0;
width: 450px;
}
Then locate the code below:
 #sidebar
{
padding: 20px 0 10px 0;
margin-left: 545px;
width: 190px;
}
…and replace it with the following:
 #sidebar
{
padding: 20px 0 10px 0;
margin-left: 20px;
width: 190px;
}
4. Adding commenting options to the loop
If you would like to add some details regarding a post’s comments to the homepage loop, it is simply a matter of adding some slips of code in the right place. This tutorial tweak will add two links, one showing comment count and the other displaying the option of leaving a comment.
Go to the theme editor and select index.php (some themes also use home.php for the frontpage) and locate the code below, assuming the loop posts use excerpts. If posts in the loop are still displayed in full size, please see tweak tutorial #2.
Different themes are coded differently to shorten the post length in the loop. Since this tutorial will add the comment features below the post text, here are some common examples of code to look for:
<?php the_excerpt(); ?>
<?php the_content_limit(); ?>
Once you have located the code that determines the length of the post in the loop, create appropriate div tags below them to define the placement and style of the comment features. Within them add the following code:
 <div class="define1">
<span><?php comments_number(0, 1, '%'); ?></span>
<a href="<?php the_permalink(); ?>#comments" title="View Comments">Comments</a>
</div>
 <div class="define2">
        <span><a href="<?php the_permalink(); ?>#respond" title="Leave Your Response">Leave Your response</a></span>
</div>
This example code is used in the premium WordPress theme Convergence and is displayed in the screenshot below. Background graphics have been defined in the stylesheet.

If you happen to find your homepage a bit simple and dull, these four tweaks will certainly change that. Follow each step carefully and if there is anything I might have overlooked, do not hesitate to mention it by commenting on this post. Enjoy and have fun!
The article was written by Brian Franklin of Web Hosting Search. A great resource for web hosting service information, the site has reviews on all the major hosting providers as well as articles and video tutorials on hosting applications.


nice tutorial!
Great post! Just wanted to let you know you have a new subscriber- me!
wow, im new bie thanks for this tips.easy to understand
Great tutorial! Very throrough and helpful for even the newest WordPress users! I’ll do a short writeup on my blog and add some links to your site because this is something that everybody should see!
Great tutorial !!!